Why You’ll Love These Homemade Slice and Bake Cookies
Before we dive into the ingredients, let’s talk about what makes this slice and bake design cookies recipe a keeper.
A Nostalgic Treat, Perfected: If you grew up loving the surprise of slice-and-bake cookies from the refrigerator section, these will bring back the best memories. This is a true Pillsbury copycat project, but with complete control over your ingredients. You know exactly what’s in them, resulting in a fresher, richer flavor that’s simply better than store bought.
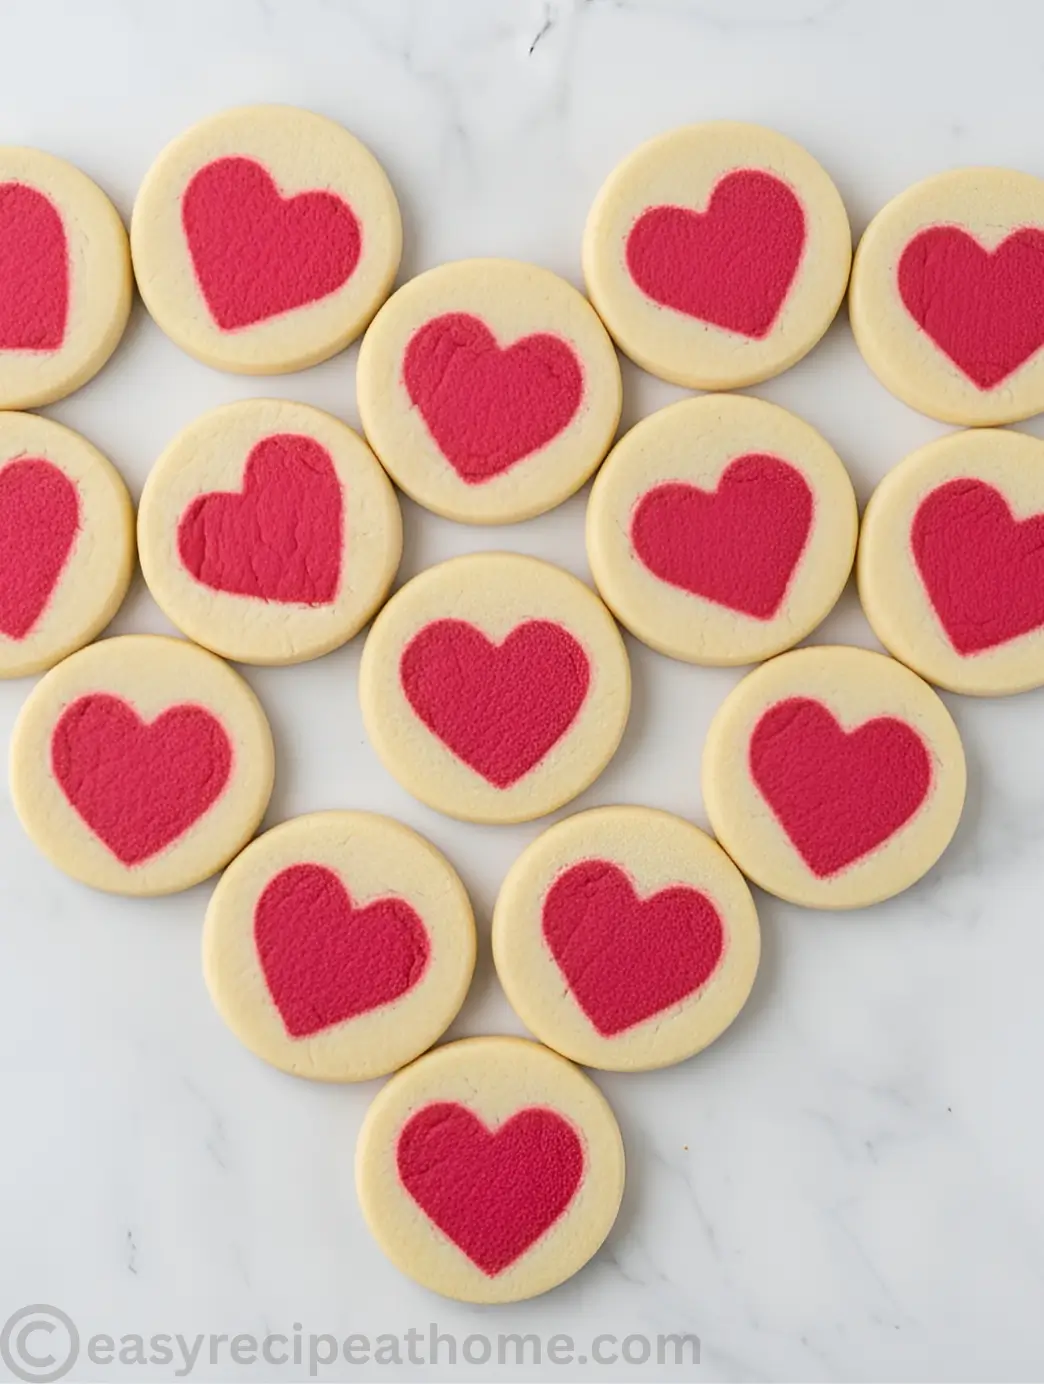
The Joy of the Process: Creating these Valentines slice and bake cookies is a fun, almost meditative activity. There’s a genuine thrill in rolling out the dough, assembling the heart log, and finally slicing into it to reveal the perfect pattern. It’s a fantastic project to do with friends, family, or even as a relaxing solo kitchen adventure.
Make-Ahead Magic: As classic refrigerator cookies (also called icebox cookies), the dough log can be wrapped tightly and stored in the fridge for a few days or the freezer for months. This make-ahead convenience means you can have freshly baked, warm heart-shaped cookies ready to impress in just 15 minutes, any time.
Endlessly Versatile: While we’re focusing on hearts today, the technique for these slice and bake cookie designs can be applied to any shape. Once you master the method, you can create ghosts for Halloween, trees for Christmas, or stars for the Fourth of July. It’s a foundational skill for beautiful decorative cookies all year round.
Key Ingredients for Success
Using quality ingredients makes all the difference in creating homemade slice and bake cookies that are tender, flavorful, and hold their design beautifully. Here’s what you’ll need and why each component matters.
For the Sugar Cookie Dough Base
➤
Unsalted Butter (¾ cup / 170 grams), softened: Using unsalted butter lets you control the salt level perfectly. Ensure it is softened to a cool, pliable temperature, this is crucial for creaming it properly with the sugar to create a light, airy dough.
➤
Granulated Sugar (1 cup / 200 grams): Provides sweetness and, when creamed with butter, helps create the cookie’s tender crumb.
➤
Pure Vanilla Extract (1 teaspoon): The warm, aromatic backbone of flavor. Always opt for pure extract over imitation for the best taste.
➤
Large Eggs (2): They act as the binder for the dough, providing structure and richness. Adding them one at a time ensures they emulsify fully into the butter and sugar.
➤
All-Purpose Flour (2 ½ cups / 315 grams): The foundation of your dough. For accuracy, the best practice is to weigh your flour. If using cups, always spoon the flour into your measuring cup and level it off. Scooping directly packs the flour in, which can lead to dry, crumbly cookies.
➤
Baking Powder (1 teaspoon): Our leavening agent, giving the cookies a slight lift and soft texture.
➤
Salt (½ teaspoon): A non-negotiable ingredient that balances the sweetness and enhances all the other flavors.
For the Slice and Bake Cookies Design
➤
Natural Pink or Red Food Coloring: This is the star for creating our lovely heart-shaped cookies. I recommend a gel or powder coloring made from sources like beetroot, purple carrot, or hibiscus. These natural food colorings produce soft, pretty pink and rose hues. While the color won’t be as vibrantly artificial as some store-bought options, the beauty and peace of mind are well worth it.
➤
Small Heart Cookie Cutter (about 1.5 inches / 4 cm wide): This is your design tool. A smaller cutter creates a higher density of hearts in each cookie slice, making the pattern more striking.
How to Make Slice and Bake Heart Cookies
This process breaks down how to make cookie dough hearts and assemble them into the iconic log. Don’t be intimidated by the number of steps, much of the time is hands-off chilling. Think of it as a fun edible craft project.
Step 1: Cream the Butter and Sugar
In the bowl of a stand mixer fitted with the paddle attachment, or using a large bowl and a hand mixer, combine the softened butter, granulated sugar, and vanilla extract. Beat on medium speed for a full 2-3 minutes. You want the mixture to become noticeably paler in color, fluffy, and smooth. This step incorporates air, which is key for the perfect texture.
Step 2: Incorporate the Eggs
Add the eggs one at a time, beating on medium-low speed just until each egg is fully blended into the mixture before adding the next. Scrape down the sides of the bowl as needed to ensure everything is evenly combined.
Step 3: Combine Dry Ingredients
In a separate medium bowl, whisk together the all-purpose flour, baking powder, and salt. This aerates the flour and distributes the leavening agent evenly, preventing pockets of baking powder in your finished cookies.
Step 4: Form the Dough
With the mixer on low speed, gradually add the dry ingredients to the wet ingredients in 2-3 additions. Mix just until the flour is incorporated and a soft dough forms. Avoid overmixing, as this can develop the gluten in the flour and make the cookies tough.
Step 5: Color a Portion of the Dough
Remove about one-third of the plain dough (roughly ⅔ of the total batch) and set it aside. This will remain your plain “wrapper” dough. To the remaining one-third of dough in the bowl, add your natural food coloring. Start with a small amount, mix it in, and assess the color. You can always add more to reach a soft pink or deeper rose hue. Remember, the color may deepen slightly after baking.
Step 6: Create and Freeze the Dough Hearts
This is the core of how to bake slice-and-bake cookies with a clear design. First, wrap the plain “wrapper” dough in plastic and leave it at room temperature. It needs to stay soft and pliable. Next, shape the pink dough into a disc, wrap it, and place it in the freezer for 15-20 minutes. This brief chill firms it up just enough for clean cutting.
On a lightly floured surface, roll the chilled pink dough into a rectangle about ½ inch (1.25 cm) thick. Use your heart cookie cutter to cut out as many hearts as possible. Re-roll the scraps gently to cut more. You’ll need enough to form a log about 10 inches (25 cm) long.
Step 7: Assemble the Heart Log
Here’s the trick for perfect slice and bake cookie designs: lightly moisten one flat side of a heart with a dab of water on your finger. Press another heart onto it, continuing until you have a long, connected line of hearts. Place this “log of hearts” on a small baking sheet or plate and freeze it for at least 30 minutes, until completely firm. This step is non-negotiable—it ensures the hearts keep their distinct shape when you add the outer dough.
Step 8: Encase the Hearts with Plain Dough
Take your reserved plain dough and divide it into two portions. On a clean surface, use your hands to press and flatten one portion into a rectangle large enough to wrap around one side of the frozen heart log. Adhere it firmly, pressing out any air pockets. Repeat with the second portion on the other side. Then, gently roll the entire log on the counter to smooth the seams and create a uniform cylinder. The goal is a seamless enclosure so the hearts are perfectly suspended inside.
Step 9: Final Chill and Slice
Wrap the completed log tightly in plastic wrap. Refrigerate for at least 2 hours, or ideally overnight. This allows the flavors to meld and the dough to firm up perfectly for slicing. When ready to bake, preheat your oven to 350°F (175°C) and line baking sheets with parchment paper.
Using a sharp knife, slice the cold dough into rounds just under ¼ inch (about ½ cm) thick. If the dough is too hard to slice cleanly, let it sit at room temperature for 5-10 minutes. Place the slices about 2 inches (5 cm) apart on the prepared sheets.
Step 10: Bake and Cool
Bake for 10-12 minutes, or just until the very edges of the cookies begin to turn a faint golden brown. The centers should still look soft and set. The aroma of buttery vanilla will fill your kitchen—a sure sign they’re done. Let the cookies cool on the baking sheet for 5 minutes before transferring them to a wire rack to cool completely.
Pro Tips for Flawless Patterned Cookies
➤ Embrace the Chill: The freezing steps for the pink dough and the assembled heart log are the secrets to crisp, well-defined shapes. Rushing this will lead to smudged designs.
➤ Keep the Plain Dough Soft: Unlike the colored dough, your plain dough should be kept at room temperature until you’re ready to use it. A soft, pliable dough is much easier to mold around the frozen heart core without cracking.
➤ Seal Tightly for Storage: For freezer-friendly cookies, wrap the finished dough log in a layer of plastic wrap, then a layer of aluminum foil. Label it and freeze for up to 3 months. To bake, let it thaw in the refrigerator overnight, then slice and bake as directed.
➤ Experiment with Flavors: Add ½ teaspoon of almond extract with the vanilla for a classic flavor pairing. You can also add a teaspoon of citrus zest (lemon or orange) to the plain dough for a bright twist.
➤ Troubleshooting Sticky Dough: If your dough feels too sticky when rolling, don’t just add more flour. First, try chilling it. If it’s still sticky after chilling, flour your work surface and rolling pin very lightly. Excess flour worked into the dough can alter the texture.
Creative Variations for Your Slice and Bake Cookie Designs
Once you master the basic heart shape, a world of slice and bake design cookies opens up. The technique is universal.
For Halloween: Use natural activated charcoal powder (sparingly) or purple sweet potato powder to create black or purple dough for bat or ghost shapes.
For Christmas: Use matcha powder for green tree shapes or a natural red coloring for ornaments and stockings.
Two-Tone Designs: Divide your plain dough and color one portion with spinach powder for green. Create a log of green hearts and wrap it in pink dough, or vice versa, for a fun, playful look.
These Slice and Bake Heart Cookies are more than just a recipe, they’re a gateway to a world of creative baking. They prove that with a little patience and the right technique, you can create stunning, professional-looking decorative cookies right in your own kitchen. The satisfaction of slicing into your homemade log to reveal a perfect row of hearts is unmatched. It’s a beautiful, delicious way to show someone you care, making them the ultimate DIY tube cookies for any occasion that calls for a touch of sweetness and love.
If you adore baking cookies with a personal touch, you might also enjoy shaping dough by hand for our delightful
Heart Shaped Chocolate Chip Cookies. And for the ultimate chocolate lover’s treat, don’t miss our decadent
Fudgy Chewy Brookies, a perfect mashup of brownie and cookie.
Frequently Asked Questions (FAQs)
1. My dough was very wet and sticky, even after chilling. What should I do?
Dough consistency can vary due to flour type, measuring method, egg size, or kitchen humidity. If your dough is too sticky to roll after the initial chill time, don’t worry. Simply add more flour, one tablespoon at a time, until it becomes workable. Always measure your flour by spooning it into the cup and leveling it off to avoid using too little.
2. The recipe took much longer than expected. Is there a quicker way?
Yes! The chilling steps are crucial for defined hearts, but one commenter, Christy, shared a great time-saving tip: “Chill your colored dough, then roll into a log shape, then shape the hearts with the table and fingers. Re-chill, then add the extra dough around, roll to smooth.” This method skips rolling and cutting out individual hearts, which is the most time-consuming part. It’s a fantastic shortcut, especially if you’re baking with impatient little helpers.
3. How many hearts do I need to cut out for the log?
The recipe states you need enough small (1.5-inch) hearts to form a connected log that is about 10 inches (25 cm) long. The exact number will depend on your cookie cutter size and how tightly you press them together. Don’t worry about counting; just focus on building a log of that length. You can re-roll the pink dough scraps to make more hearts if needed.
4. My hearts lost their shape or the dough got too soft. What went wrong?
This usually happens if the pink dough or the heart log isn’t cold enough. Another baker, Helen, experienced this: “the dough melted so i couldn’t make the heart shapes even though i froze it for longer than suggested.” Ensure your colored dough is firm from the freezer before cutting. Most importantly, after assembling the heart log, freeze it until it is completely solid (not just chilled) before adding the outer dough. This prevents the hearts from smushing.
5. Can I simplify this for young children to help with?
Absolutely. If the detailed process is too long for kids, consider a simpler approach. One baker, Emma, said: “I actually just decided to color the whole dough and make heart cookies.” You can color all the dough pink, roll it into a simple log, slice, and bake for delicious solid-colored heart cookies. It’s much faster and still yields a festive, fun treat perfect for little hands to slice.
6. Can I make the dough ahead of time?
Yes, that’s one of the best features of slice-and-bake cookies! You can wrap the finished log tightly in plastic wrap and store it in the refrigerator for up to 3 days or in the freezer for up to 3 months. When ready to bake, let a refrigerated log sit for 10 minutes, or a frozen log thaw for about 15 minutes at room temperature before slicing.