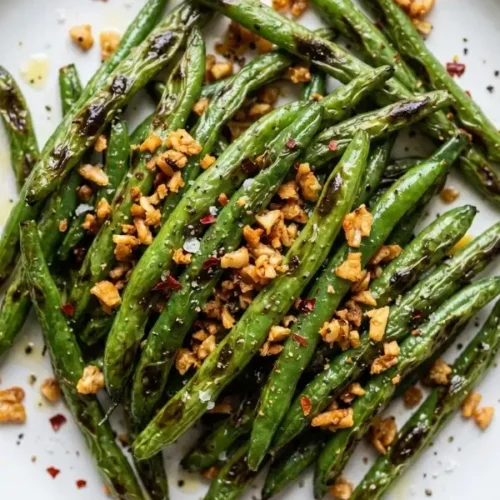
Throwing raw vegetables into a basket and blasting them with high-velocity hot air completely transforms your boring dinner sides. These deeply blistered air fryer green beans deliver an incredible, salty crunch with perfectly toasted garlic bits in just ten minutes.

Why You’ll Enjoy These Crispy Green Beans Made in an Air Fryer
We always struggle to find highly textured, savory vegetable sides that actually get eaten without complaints at the dinner table.
This incredibly fast air fryer method completely bypasses those terribly mushy, over-steamed green beans from our childhood.
You get to create a stunning, restaurant-quality side dish without boiling massive pots of water or turning on your heavy oven.
The high-speed convection air forces the green skin to wrinkle and blister quickly, creating tiny pockets that trap the rich olive oil.
To be honest, throwing in some raw, minced garlic midway during cooking makes a huge difference to the dish’s flavor profile.
Those tiny pungent pieces transform into dark, golden-brown garlic chips that stick beautifully to the salty, charred edges of the vegetables.
This fast technique saves you a massive amount of kitchen prep time during those chaotic weeknight dinner rushes.
You just toss the raw produce in a simple bowl, push a single button, and walk away to handle your heavy main courses.
Finding cheap healthy dinners that look gorgeous on a serving platter usually requires hours of tedious, stressful kitchen work.
This vibrant green presentation contrasts beautifully against the dark, toasted aromatics, making it look like a highly complicated chef creation.
You will absolutely love how the coarse sea salt crystals violently melt into the hot oil glaze right at the end.
Every single bite provides a loud, satisfying snap followed immediately by a massive wave of deep, earthy garlic flavor.
The Culinary Science Behind Blistered Vegetables
You absolutely must understand the basic kitchen science that happens when high-velocity hot air violently hits raw, dense vegetables.
Fresh green beans carry a massive amount of internal water that naturally wants to turn to heavy steam when exposed to high heat.
If you dump soaking wet, freshly washed beans directly into the metal basket, that surface water instantly ruins your entire dinner.
This trapped moisture completely blocks the dry heat from hitting the vegetable skin, leaving you with a soggy, rubbery, unappetizing mess.
You need to aggressively dry every single pod with a clean kitchen towel to ensure the hot air hits a bone-dry surface.
Once that dry skin hits the screaming hot 400°F air, the exterior violently shrinks and blisters into a highly textured, savory crust.
The exact same scientific rules apply to how your minced aromatics behave inside the small, tightly enclosed cooking drawer.
Fresh garlic holds a ton of natural sugars that will quickly burn into a bitter, completely black cinder if exposed to prolonged heat.
Adding those tiny garlic specks strictly at the halfway mark ensures they toast beautifully without crossing the line into burnt territory.
They ride the hot oil coating the beans, frying into crispy chips that deliver a massive umami punch to your palate.
This specific cooking method dramatically reduces your active cooking time by forty percent compared to traditional, slow oven roasting.
The heavy metal basket allows the dry heat to circulate perfectly underneath the food, ensuring a perfectly even, highly caramelized sear.
You are essentially creating a totally dry frying environment without needing gallons of heavy, greasy vegetable oil on your stove.
This tiny drop of olive oil is used solely to conduct the heat, ensuring that intense, flavorful crispiness we all love so much.
Fresh Ingredients You Need For This Savory Side
Gather these incredibly simple pantry staples to build this highly textured, garlic-heavy masterpiece today. Think of your ingredients as a careful balance of high-heat cooking fats and sharp, heavily pungent aromatics.
- Fresh Green Beans: You need 1 lb of completely raw, bright green pods. It is absolutely critical to use fresh produce, as frozen or canned beans will immediately turn into a watery, completely unappetizing paste in the basket.
- Extra Virgin Olive Oil: Pour out 1.5 tablespoons of rich, dark olive oil. This heavy fat acts as your primary heat conductor, forcing the vegetable skins to fry rapidly rather than just dry out and turn to dust.
- Fresh Garlic Cloves: Take 4 large cloves and cut them into very small, uniform pieces. These pungent little pieces slowly transform into concentrated, crispy golden chips that aggressively cling to the blistered vegetables for maximum flavor.
- Coarse Sea Salt: You need 1 teaspoon of heavy, highly coarse sea salt crystals. We use large grains specifically for the irregular, crunchy bursts of salinity that fine table salt simply cannot provide on a dry vegetable.
- Cracked Black Pepper: Measure out exactly half a teaspoon of fresh black pepper. It provides a very subtle, warm background heat that perfectly cuts through the heavy richness of the cooked olive oil glaze.
How to Make Crispy Garlic Air Fryer Green Beans
-
Step 1
Wash and Aggressively Dry the Produce
Drop your fresh green beans into a plastic colander, rinsing them thoroughly under freezing cold tap water to remove any heavy field dirt.
You absolutely must dry them aggressively with a clean kitchen towel until the skins are completely, bone-dry to the touch.
If you carelessly skip this drying phase, your vegetables will steam in the basket and turn horribly mushy.
Taking exactly two extra minutes to wipe them down guarantees that restaurant-quality, blistered crust you are looking for.
-
Step 2
Trim the Stiff Stems
Line up small handfuls of the dry pods on your wooden cutting board, taking care to keep them somewhat organized in a row.
Use a heavily sharpened chef knife to cleanly slice off the tough, woody stem ends, leaving the thin, tapered tails entirely intact.
Leaving the small tails on the beans provides a beautifully rustic, highly authentic visual appeal when you finally plate the dish.
Throw the tough stems straight into your compost bin, as they are far too fibrous and chewy to eat.
-
Step 3
Build the Heavy Oil Glaze
Toss your trimmed vegetables directly into a large stainless steel mixing bowl, pouring the heavy olive oil straight over the top of the pile.
Add your coarse sea salt and cracked pepper, tossing everything vigorously with your bare hands.
You must ensure every single pod has a thick, completely glistening coat of fat before they hit the heat.
This heavy oil barrier is the exact scientific mechanism that forces the green skins to fry and blister rapidly.
-
Step 4
The Initial High-Heat Blast
Preheat your empty air fryer drawer to a screaming hot 400°F, or 200°C, to guarantee a proper, heavy sear.
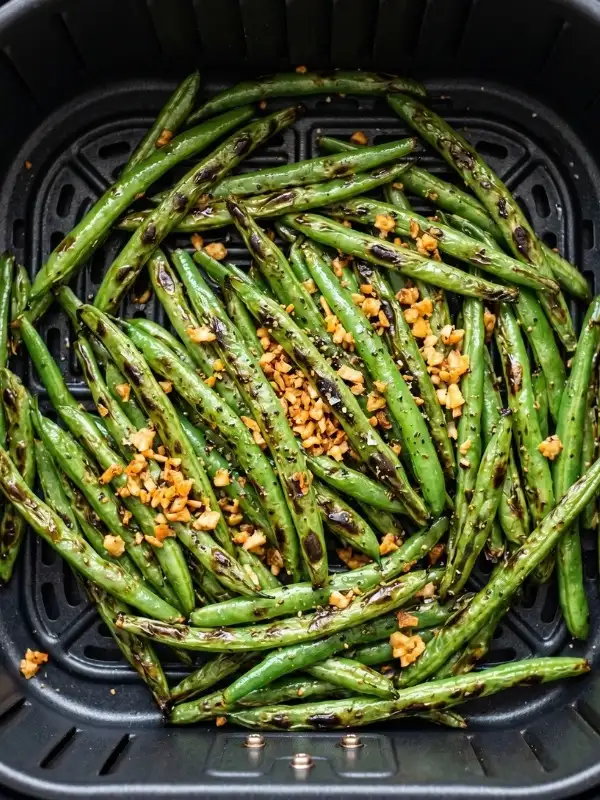
Spread the oiled vegetables evenly across the hot metal grate, sliding the heavy drawer shut to cook totally undisturbed.
Let the raw vegetables blast in the hot convection wind for exactly five minutes without peeking inside.
You will eventually hear a loud, aggressive sizzling sound as the high heat forces the natural water out of the green skins.
-
Step 5
Integrate the Raw Garlic
Pull the hot basket open after five minutes, checking to ensure the green skins are visibly starting to wrinkle, shrink, and blister.
Dump your finely minced raw garlic straight over the hot pods, shaking the entire basket aggressively to distribute the tiny specks.
You want those tiny pieces of raw garlic to stick directly to the hot oil coating the vegetables.
This ensures they toast beautifully in the moving air instead of just falling through the metal grates and burning on the bottom.
-
Step 6
Blister and Serve
Slide the heavy basket back into the machine, letting the vegetables fry for another three to five minutes until perfectly cooked.
Once the garlic turns a deep golden-brown and the bean tips show dark char marks, stop the machine.
Transfer everything into a wide, shallow serving bowl immediately, using a rubber spatula to scrape out all the crispy garlic bits.
The residual heat from the bowl will continue to intensify the sharp aroma of the garlic and salt before you eat.
Expert Tips for the Best Charred Texture
You absolutely must avoid overcrowding your cooking basket if you want a massive, heavy crunch on your food.
If you stack the raw vegetables into a giant mountain, the hot air cannot circulate, and the entire pile will just gently steam.
If you are cooking a massive double batch for a holiday party, you need to work in two completely separate stages.
Taking the extra time to fry them in small batches guarantees that professional, deeply charred edge on every single plate.
While we love dark extra virgin olive oil for its rich, earthy flavor profile, you have other fantastic options.
If you want to push the temperatures even higher for a darker char, swapping to a completely neutral avocado oil works beautifully.
You need to shake the heavy metal drawer vigorously at least twice during the short cooking process.
Giving the basket a massive jolt ensures the sticky green beans roll over, allowing the raw garlic to fry evenly on all sides.
Always taste one single bean right out of the hot basket before you bring the massive bowl to the dinner table.
You might need to hit the blistering hot vegetables with one final, heavy pinch of coarse sea salt to wake up the flavors.
Delicious Protein Pairings and Dinner Ideas
Because these blistered, garlic-heavy vegetables carry such a massive savory crunch, they pair perfectly with deeply rich, slow-cooked meats.
A generous serving of these beans, served as a side dish with our sweet, sauce-drenched pulled pork recipe, perfectly balances out the bold flavors of the barbecue.
You can also build a completely comforting, nostalgic weeknight dinner by leaning heavily into rich, cheesy chicken dishes.
A fuming plate of my creamy garlic and Parmesan chicken pairs perfectly with the crispy, acidic and salty texture of these roasted greens.
If your family loves extremely tender, fall-apart poultry, you should absolutely plan to run your slow cooker all day.
My ridiculously sweet, dark Crock Pot Dr. Pepper Chicken provides a stunning, sticky contrast to the dry, blistered texture of the savory beans.
Sometimes you need a massive, highly seasoned dinner to completely shock your hungry guests on a Friday night.
The violently crunchy, aggressively spiced exterior of our chicken shawarma recipe tastes amazing when eaten with a big forkful of these salty vegetables.
If you need to feed extremely picky children, you must rely on sweet, heavy glazes to keep them totally happy.
Using the sticky, bright citrus sauce from my orange chicken recipe over these crunchy green beans makes them disappear instantly.
You can also build an entirely different meal format by tossing these charred vegetables directly into a larger pasta bowl.
Mixing them right into my savory, budget-friendly garlic chicken rotini adds an incredible layer of intense, roasted garlic flavor.
If you completely want to skip the heavy carbohydrates tonight, you can serve these crunchy pods alongside thick cuts of poultry.
My heavy, cream-based garlic parmesan chicken provides massive amounts of fat that the dry, blistered vegetables soak up beautifully.
You can even prep these salty green beans to serve alongside rich, baked vegetarian side dishes for a massive holiday spread.
A large slice of my soft, deeply savory zucchini spinach feta casserole works perfectly with the aggressive, toasted garlic chips.
How to Store and Reheat Leftovers
These golden-brown vegetables, glazed with oil, owe their irresistible, restaurant-quality texture entirely to their crispy, dry crust.
You must let the hot bowl completely cool down to room temperature before you even think about packing away the leftovers tonight.
If you carelessly seal steaming hot vegetables inside a cold plastic container, the trapped heat creates massive amounts of condensation.
That moisture will drip right onto your delicious garlic chips, turning the whole dish into a watery, rubbery mess.
Keep the cooled beans tightly sealed inside a heavy glass container in your cold refrigerator for a maximum of three consecutive days.
When you want a quick snack, you absolutely must avoid the microwave, as the radiation aggressively destroys the delicate, blistered vegetable skin.
Instead, toss the cold leftovers directly back into your air fryer basket at a warm 350°F for about three minutes.
The circulating hot air instantly revives the glistening olive oil glaze, bringing that loud, satisfying crunch right back to the garlic bits.
We strongly advise against throwing these delicate roasted vegetables into your deep freezer for long-term meal prep storage.
The aggressive freezing process completely shatters the cellular walls of the green beans, leaving you with a watery, totally unappetizing pile of mush upon thawing.
Frequently Asked Questions
You really should avoid the frozen bags entirely for this specific dry-heat cooking method.
Frozen produce holds an enormous amount of internal ice that rapidly turns to heavy steam, completely preventing the skins from blistering and leaving you with mushy vegetables.
No, you absolutely do not need to drop these raw pods into boiling water before tossing them into the basket.
Skipping the boiling process entirely ensures the skins remain completely dry and tight, which is the absolute secret to getting those dark, charred edges.
If you want a violently crunchy garlic chip, you must ensure you are mincing the fresh cloves into extremely tiny, highly uniform specks.
Large, irregular chunks of raw garlic will stay soft in the middle while the outside edges completely burn to a bitter crisp.
While dark extra virgin olive oil provides an incredibly rich, earthy flavor profile, it does have a slightly lower smoke point.
If you want to push the temperatures even higher for a darker char, swapping to a completely neutral avocado oil works beautifully.
You most likely dumped the raw garlic into the basket at the very beginning of the long cooking cycle.
You absolutely must wait until the halfway mark to add the aromatics, otherwise the intense heat completely incinerates the natural plant sugars inside the cloves.
You only need to cleanly slice off the tough, woody stem end that originally connected the pod to the plant.
Leaving the delicate, thin tail completely intact provides a gorgeous, highly rustic visual appeal when you finally pile them onto a serving platter.
You can use fine salt in an absolute emergency, but it will quickly dissolve entirely into the hot olive oil glaze.
Coarse sea salt forms beautiful, distinct crystals that release intense, bursts of pronounced saltiness when you bite into these crispy beans.
Blistered Air Fryer Green Beans with Crispy Minced Garlic
Equipment
- Large Air Fryer
- Massive Mixing Bowl
- Sharp Chef Knife
- Clean Kitchen Towel
- Rubber Spatula
Ingredients
- 1 lb Fresh green beans completely raw with the stiff stems trimmed off, (approx 450g)
- 1.5 tablespoons Extra virgin olive oil intensely rich and dark, (approx 22ml)
- 4 cloves Fresh garlic totally raw and finely minced into uniform specks, (approx 20g)
- 1 teaspoon Coarse sea salt highly textured with large crystals, (approx 5g)
- 1/2 teaspoon Black pepper freshly and heavily cracked, (approx 2g)
Instructions
- Prep the Produce: Drop the fresh green beans into a colander and rinse thoroughly under cold water. You absolutely must dry them aggressively with a clean kitchen towel until completely bone-dry to the touch.
- Trim the Beans: Use a heavily sharpened chef knife to cleanly slice off the tough, woody stem ends of the pods. Leave the thin, tapered tails entirely intact for a rustic visual appeal.
- Build the Glaze: Toss the dry, trimmed vegetables directly into a large stainless steel mixing bowl. Pour the olive oil over the top, add the sea salt and black pepper, and toss vigorously with your hands until thickly coated.
- The Initial Blast: Preheat your empty air fryer basket to a screaming hot 400°F (200°C). Spread the oiled vegetables evenly inside, sliding the drawer shut to cook totally undisturbed for exactly 5 minutes.
- Integrate the Garlic: Pull the hot basket open and dump your finely minced raw garlic straight over the blistering pods. Shake the entire basket aggressively to distribute the tiny specks so they stick to the hot oil.
- Finish and Serve: Slide the basket back into the machine and fry for another 3 to 5 minutes. Once the garlic turns deep golden-brown and the bean tips show dark char marks, scrape everything immediately onto warm serving plates!
Notes
Did Your Family Clean Their Plates Tonight?
Did these violently crunchy, garlic-heavy vegetables completely solve your dinner time struggles this evening? Please tap that 5-star rating and drop a quick comment below to tell me exactly how your kids reacted to the deeply toasted garlic chips!
For even more budget-friendly, healthy, and easy meal ideas that your whole family will actually love, make sure to follow our Pinterest page here. We post daily inspiration to keep your dinner routine simple, delicious, and incredibly affordable.