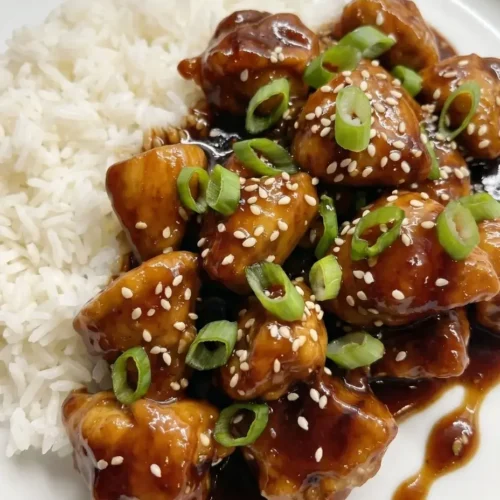
Why You Will Love This Mongolian Chicken
We all have those exhausted weeknights where ordering delivery feels completely necessary.
This fast dinner completely solves that problem by using basic pantry staples you probably already own.
You get ridiculously juicy poultry covered in a dark, glossy brown sugar glaze.
It hits every single salty and sweet craving without the heavy, greasy feeling of deep-fried restaurant food.
Everything comes together in one single hot skillet for extremely fast cleanup.
It is just as easy and satisfying as my One-Pot Creamy Mushroom Chicken Orzo, but it delivers bold Asian-inspired flavors.
Sure, picking up a takeout menu is tempting when you are tired.
However, making this scratch-made meal is actually much faster and vastly cheaper for your family.
The Secret to Crispy Meat Without Deep Frying
Restaurant versions always drop the meat into massive vats of boiling oil to get that crunchy exterior.
You absolutely do not need to deal with that dangerous, messy hassle in your home kitchen.
The trick is aggressively coating your raw pieces in dry cornstarch before they ever hit the pan.
The fine powder creates a tight, golden shell when it touches a very thin layer of hot canola oil.
This shallow pan-fry method seals all the natural juices tightly inside the meat.
It also leaves behind highly flavorful, crispy brown bits glued to the metal skillet for your sauce.
Ingredients
Ingredients You Need
- Chicken: Buy 1 lb/approx. 450g of boneless skinless breasts or thighs. Cut them into uniform, bite-sized cubes so they cook at the exact same speed in the hot pan.
- Cornstarch: You need 1/4 cup/approx. 30g of dry cornstarch to coat the raw meat. This creates that essential crispy barrier and naturally thickens your sticky glaze later.
- Cooking Oil: Grab 2 tablespoons/approx. 30ml of a neutral oil like canola or vegetable. Do not use extra virgin olive oil, because it burns way too quickly under high heat.
- Soy Sauce: Measure out 1/2 cup/approx. 120ml of low-sodium soy sauce. You must use the low-sodium version, or the final pan sauce will become painfully salty as it boils down.
- Brown Sugar: Pack 1/2 cup/approx. 100g of dark brown sugar into your measuring cup. The dark molasses gives the sauce a beautiful, deep mahogany color and a thick, syrupy texture.
- Fresh Garlic: Smash and mince 4 large garlic cloves very finely on your cutting board. Fresh garlic provides a sharp, savory punch that cuts right through the heavy sugar sweetness.
- Fresh Ginger: Grate 1 tablespoon/approx. 15g of fresh ginger root. The spicy, bright bite of real ginger is absolutely crucial for creating an authentic takeout flavor profile.
- Water: Keep 1/2 cup/approx. 120ml of cold water ready in a glass. This thins out the heavy soy mixture so it can simmer and reduce properly in the hot skillet.
- Green Onions: Chop 4 whole green onions, keeping the white and green parts separated. The crisp, grassy tops provide a massive pop of fresh color and texture at the very end.
How To Make
How to Make Mongolian Chicken
-
Step 1
Prep and Coat the Meat
Start by placing your raw, cubed poultry into a large glass mixing bowl.
Sprinkle the dry cornstarch entirely over the top of the wet meat.
Toss everything aggressively with your bare hands until every single piece is heavily coated and looks completely white.
You do not want any pink, wet spots showing through the powdery starch.
-
Step 2
Sear for a Hard Crust
Place a very wide, heavy-bottomed skillet onto your stove over medium-high heat.
Pour in your neutral oil and wait patiently until it shimmers and looks dangerously hot.
Carefully drop the coated pieces into the sizzling oil, keeping them in a single, flat layer.
Let them cook totally undisturbed for three minutes so a hard, golden crust forms on the bottom.
Flip the pieces over and cook for another three minutes until they are fully crispy and browned.
Remove the cooked meat onto a clean plate, leaving the hot, greasy pan right on the stove.
-
Step 3
Mix the Sticky Sauce
While the meat rests, lower your stove heat to medium to stop the pan from smoking.
Drop your minced garlic, grated ginger, and the white parts of the chopped onions right into the leftover oil.
Stir the aromatics constantly for roughly thirty seconds until that sharp, punchy smell fills your entire kitchen.
Pour in your soy sauce, cold water, and packed brown sugar directly over the sizzling vegetables.
-
Step 4
Simmer and Thicken
Use a wooden spoon to fiercely scrape up all those crispy, dark brown bits stuck to the metal pan.
Let the dark liquid come to a rapid, rolling boil, then drop the heat to a gentle simmer.
Allow the sweet sauce to bubble and thicken slightly for about three minutes.
It should start looking very glossy and coat the back of your spoon like a dark syrup.
-
Step 5
Toss and Serve
Dump your resting, crispy meat directly back into the bubbling, sticky pan glaze.
Toss everything together aggressively for one minute until the dark sauce clings tightly to every single piece.
Turn off the hot stove completely and fold in the bright green onion tops.
Serve immediately while the savory crust is still crunchy and the glaze is piping hot.
Common Mistakes When Cooking Mongolian Chicken
Crowding the Hot Pan
The absolute fastest way to ruin this beautiful recipe is by dumping all the raw meat in at once.
When you overcrowd the hot skillet, the temperature of the oil plummets instantly.
Instead of getting a gorgeous, hard sear, the meat just sits there and steams in its own pale juices.
You will completely lose that essential crispy crust, resulting in rubbery, sad bites.
Take the extra time to fry the coated pieces in two completely separate batches if your pan is small.
It guarantees a loud sizzle and a perfectly golden exterior every single time.
Using the Wrong Soy Sauce
Grabbing regular, full-sodium soy sauce is a massive trap that destroys the delicate balance of this meal.
As the dark pan sauce violently boils and reduces, the salt concentration becomes incredibly intense.
You absolutely must use a low-sodium brand to keep the final dish edible and enjoyable.
If the sticky glaze still feels too salty, you can always add a tiny splash of extra water to dilute it.
Skipping the Cornstarch Coating
Some people try to skip the messy starch step to save a few seconds during prep time.
Doing this entirely strips the sauce of its ability to cling to the slippery meat.
The powdery coating not only creates the crispy shell, but it also drops thick starches into the boiling pan drippings.
That is the exact chemical reaction that turns watery soy sauce into a heavy, glossy syrup.
Variations
Simple Variations and Customizations
This fast takeout recipe is incredibly flexible, allowing you to easily sneak extra vegetables into your dinner.
Throwing in a huge handful of fresh broccoli florets adds a wonderful, earthy crunch to the heavy meal.
If you love incredibly spicy food, just sprinkle a heavy pinch of crushed red pepper flakes into the hot oil.
The dry chili flakes bloom beautifully, adding a massive, fiery kick to the sweet brown sugar sauce.
You can also swap the poultry out entirely and use thinly sliced flank steak instead.
If you enjoy the heavy, savory beef flavors of my Instant Pot Pot Roast, you will absolutely love a classic Mongolian beef variation.
For a completely different texture, try tossing in some sliced bell peppers and water chestnuts right at the very end.
They provide a loud, snappy bite that contrasts perfectly with the soft, tender meat.
Looking for other insanely rich, comforting dinners for the week? My creamy, decadent Crock Pot Marry Me Chicken delivers massive restaurant-quality flavor with barely any hands-on prep work.
Serving Ideas
What to Serve With This Sticky Chicken
Because this dark, savory glaze is so intensely flavored, you absolutely need a bland, starchy base to soak it all up.
Serving this over a massive bowl of steaming hot white jasmine rice is always a flawless choice.
The fluffy, dry rice grains act like tiny sponges, absorbing every single drop of that sweet soy sauce perfectly.
You will not want to leave a single drop of that sticky gravy behind in the skillet.
If you strongly prefer noodles over rice, try tossing some boiled lo mein or thick udon noodles directly into the pan.
They get heavily coated in the glossy sauce, making it feel like a totally authentic takeout experience.
When you crave rich pasta but want a completely different flavor profile, my Lemon Chicken Gnocchi is a fantastic option.
It gives you bright, citrusy comfort food right on your stovetop without any extra boiling.
If you are cooking for a huge crowd, you might want to serve a massive, cheesy side dish.
My incredibly popular Tater Taco Casserole feeds an absolute army and requires barely any cleanup.
For a totally hands-off side dish that cooks itself, check out my French Onion Chicken Orzo Casserole.
The deeply caramelized flavors work wonderfully alongside almost any heavy, savory main course.
If you want to add some serious smoky, roasted flavors to your weekly meal prep, my Sheet Pan Sausage and Sweet Potatoes is brilliant.
It uses incredibly cheap ingredients and basically cooks itself in a violently hot oven.
Storage & Meal Prep
How to Store and Reheat Leftovers
This sticky takeout meal is an absolute dream for busy people who desperately need to meal prep their work lunches.
The intense, salty flavors actually develop and taste significantly better after sitting in the cold fridge overnight.
Let your hot skillet cool completely to room temperature before packing anything away in airtight glass containers.
Storing blazing hot food immediately traps excessive steam, turning that beautiful crispy crust into wet, gray mush.
Keep the tightly sealed glass boxes safely in your refrigerator for up to four full days.
When you get hungry, just pop a container in the microwave for two minutes until the dark sauce bubbles.
If you love meals that reheat flawlessly for massive family dinners, try my Slow Cooker Taco Pasta with Ground Beef.
It stays ridiculously cheesy and soft for days, making it the perfect leftover lifesaver.
I really do not recommend freezing this specific cornstarch-coated recipe for long-term storage.
The breading totally degrades in the freezer, leaving you with a watery, highly unpleasant texture once it thaws out.
For meals that actually survive the deep freeze beautifully, lean on heavy, creamy gravy recipes.
My classic Chicken Pot Pie Crock Pot Recipe freezes perfectly and warms you right up on freezing, dark evenings.
Frequently Asked Questions
Frequently Asked Questions
Why is my sauce so thin and watery?
You likely did not let the dark liquid simmer long enough on the hot stove to reduce properly.
The residual cornstarch left in the pan needs a few solid minutes of gentle boiling to naturally thicken the gravy.
Can I use honey instead of dark brown sugar?
Yes, you can absolutely substitute honey, but it will significantly change the final flavor profile.
Brown sugar provides a deep, molasses-heavy richness that gives this specific recipe its authentic, sticky restaurant taste.
Do I have to use fresh ginger and garlic?
I strongly recommend fresh aromatics, because dried powders simply cannot provide that punchy, sharp bite.
However, in a total emergency, you can use dried spices, though the pan sauce will lose some of its vibrant, fresh kick.
How do I keep the meat from sticking to the pan?
You must wait patiently until your cooking oil is violently hot before dropping the raw meat in.
If you put cold meat into cold oil, the sticky cornstarch will instantly glue itself right to your metal skillet.
Can I make this recipe entirely gluten-free?
Yes, this meal is incredibly easy to adapt for gluten sensitivities with one simple swap.
Just make sure you use a certified gluten-free tamari or coconut aminos instead of traditional wheat-based soy sauce.
Time to Eat
Serving this sticky, caramelized meal on a busy weeknight will completely change how you view homemade dinners.
Grab your heavy skillet, toss those simple ingredients together, and enjoy the absolute best takeout you have ever made!